
DIY RAISED GARDEN BED
Elevate your backyard with the raised garden bed plan from YellaWood®.
Building a raised garden bed system is an easy way grow vegetables or flowers with fewer weeds, better water retention and drainage, and warmer soil for extended growing seasons. With our easy-to-follow raised bed plan, you can craft multiple neat and contained growing spaces in just one day. In just one weekend you can create a yard full of fresh greens and flowers. If you have limited space or need to expand your growing area, simply alter the cut list measurements for your side pieces to create smaller or larger dimensions for your DIY raised garden beds – the core concepts and details of the plan are the same.
While making a DIY raised garden bed, keep in mind the final form and function of your piece. The straightforward corner trim detail in our raised garden bed plans covers the sidepiece end grain and reinforces the corners for a clean, functional look. Additionally, our plan does not use weatherproof glue, which will lead to an eventual curled, “weathered barn,” look with somewhat loose joints. Not your style? You can opt for weatherproof glue to preserve the original look of the box. When finishing your DIY raised garden bed project, landscape fabric should be stapled to the bottom to keep your potting mix in place while allowing adequate drainage for your plantings. (Proper drainage is critical for plant health because it ensures necessary aeration for the soil to avoid root rot.)
And remember, raised garden beds don’t have to stay out on the lawn – you can also build a garden box for the patio or deck to create a little herb garden right outside your door (or consider our DIY planter box plan).
Note: YellaWood® brand products are treated with a micronized copper wood preservative and are approved for use in applications such as a raised vegetable bed. Learn more about our environmental certifications.
Before you get started, please read our info on safety, fasteners and building tips. Before building, please consult our Terms of Use.
How to Build a Raised Garden Bed
What you’ll need when making a raised garden bed:
Materials
- (1) 2 x 8 x 8' YellaWood® brand pressure treated pine
- (1) 1 x 4 x 5' YellaWood® brand pressure treated pine
- 3" deck screws
- 1 ½" galvanized brads or finish nails
- ⅜" galvanized staples
- Landscape fabric (at least 24" x 27")
- YellaWood Protector® Stain and Sealer
Tools
- Circular saw or miter saw (or even a hand saw)
- Drill/driver
- 7 /64" drill bit
- Hammer
- Utility knife
- Brad nailer or hammer and nail set
Plan Preview
DIY RAISED GARDEN BED PLAN PREVIEW
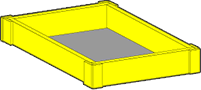
The supply list in the YellaWood raised bed plan is for one 24” x 24” box that will sit about 8 inches off the ground. This is the perfect size for herbs or flowers on a patio or small lawn, but some plants, such as squash, need more space to grow. If you want to extend the area, increase the cut measurements of all four sides equally. If you just want to extend the length, increase the measurement of two of the four sides.
- Cut your side pieces. Four lengths of 2 x 8 for the sides, cut at 24” will create a neat little box for your garden. You can adjust this as needed.
- Connect the sides. Using deck screws, keep the outside faces flush with the ends – it helps to do this on a flat surface.
- Cut your trim pieces. Place two pieces at each corner so they overlap the joints of the box assembly.
- Attach landscape fabric. Attach a piece of landscape fabric to what are now the top edges (but will eventually become the bottom) with galvanized staples and a little room in the fabric to sag. Trim the edges of the fabric once in place and sand smooth.